1.配置代理服务器安装Nginx
配置nginx的yum源:
[root@localhost ~]# cat /etc/yum.repos.d/nginx.repo
[nginx-stable]
name=nginx stable repo
baseurl=http://nginx.org/packages/centos/$releasever/$basearch/
gpgcheck=1
enabled=1
gpgkey=https://nginx.org/keys/nginx_signing.key
module_hotfixes=true

[nginx-mainline]
name=nginx mainline repo
baseurl=http://nginx.org/packages/mainline/centos/$releasever/$basearch/
gpgcheck=1
enabled=0
gpgkey=https://nginx.org/keys/nginx_signing.key
module_hotfixes=true
下载nginx并启动
[root@localhost ~]# yum -y install nginx
[root@localhost ~]# systemctl restart nginx
[root@localhost ~]# systemctl enable nginx
检查nginx是否启动
[root@localhost ~]# ps -ef |grep nginx
root       1838      1  0 14:00 ?        00:00:00 nginx: master process /usr/sbin/nginx -c /etc/nginx/nginx.conf
nginx      3715   1838  0 19:24 ?        00:00:00 nginx: worker process
nginx      3716   1838  0 19:24 ?        00:00:00 nginx: worker process
nginx      3717   1838  0 19:24 ?        00:00:00 nginx: worker process
nginx      3718   1838  0 19:24 ?        00:00:00 nginx: worker process
root       3748   1736  0 19:41 pts/0    00:00:00 grep --color=auto nginx
编写nginx配置文件
[root@localhost ~]# cat /etc/nginx/conf.d/blog.linux.cn.conf
upstream wordpress {
	server 11.0.1.138:80;
	server 11.0.1.139:80;
}
server {
	listen 80;
	server_name blog.linux.cn;

	access_log /var/log/nginx/wordpress.access.log main;
	location / {
	  proxy_pass http://wordpress;
	  proxy_set_header Host $http_host;
	}
}
2.配置web01服务器
安装nginx,把上面的yum源copy过来下载并启动
编写web1配置文件
[root@rocky-boy ~]# cat /etc/nginx/conf.d/blog.linux.cn.conf
server {
	listen 80;
	server_name blog.linux.cn;
	root /usr/share/nginx/blog;

	access_log /var/log/nginx/wordpress.access.log main;

	location / {
	 index index.php;
	}

	location ~ \.php$ {
		fastcgi_pass unix:/var/run/php-fpm/www.sock;
		fastcgi_index index.php;
		fastcgi_param SCRIPT_FILENAME $document_root$fastcgi_script_name;
		include fastcgi_params;
	}
}
创建web01服务器站点目录
[root@rocky-boy ~]# mkdir /usr/share/nginx/blog
[root@rocky-boy ~]# cd /usr/share/nginx/blog/
[root@rocky-boy blog]# rz wordpress-5.9.1-zh_CN.tar.gz   # 自行上传代码,可以官网下载......略
[root@rocky-boy blog]# tar xf wordpress-5.9.1-zh_CN.tar.gz
[root@rocky-boy blog]# chown -R nginx:nginx /usr/share/nginx/blog/    # 修改用户权限,否则会报错
[root@rocky-boy blog]# ll
total 76220
-rw-r--r--  1 nginx nginx      405 Mar 27 18:41 index.php
-rw-r--r--  1 nginx nginx    19915 Mar 27 18:41 license.txt
-rw-r--r--  1 nginx nginx     7437 Mar 27 18:41 readme.html
drwxr-xr-x  5 nginx nginx     4096 Mar  3  2022 wordpress
-rw-r--r--  1 nginx nginx 19461582 Mar 22  2023 wordpress-5.9.1-zh_CN.tar.gz
-rw-r--r--  1 root  root  58356915 Mar 27 18:45 wordpress.tar.gz
-rw-r--r--  1 nginx nginx     7165 Mar 27 18:41 wp-activate.php
drwxr-xr-x  9 nginx nginx     4096 Mar 27 18:41 wp-admin
-rw-r--r--  1 nginx nginx      351 Mar 27 18:41 wp-blog-header.php
-rw-r--r--  1 nginx nginx     2338 Mar 27 18:41 wp-comments-post.php
-rw-r--r--  1 nginx nginx     3001 Mar 27 18:41 wp-config-sample.php
-rw-rw-rw-  1 nginx nginx     3278 Mar 27 18:43 wp-config.php
drwxr-xr-x  5 nginx nginx       69 Mar 27 18:43 wp-content
-rw-r--r--  1 nginx nginx     3939 Mar 27 18:42 wp-cron.php
drwxr-xr-x 26 nginx nginx    12288 Mar 27 18:42 wp-includes
-rw-r--r--  1 nginx nginx     2496 Mar 27 18:42 wp-links-opml.php
-rw-r--r--  1 nginx nginx     3900 Mar 27 18:42 wp-load.php
-rw-r--r--  1 nginx nginx    47916 Mar 27 18:42 wp-login.php
-rw-r--r--  1 nginx nginx     8582 Mar 27 18:42 wp-mail.php
-rw-r--r--  1 nginx nginx    23025 Mar 27 18:42 wp-settings.php
-rw-r--r--  1 nginx nginx    31959 Mar 27 18:42 wp-signup.php
-rw-r--r--  1 nginx nginx     4747 Mar 27 18:42 wp-trackback.php
-rw-r--r--  1 nginx nginx     3236 Mar 27 18:42 xmlrpc.php
安装php,rokcy linux有默认的php版本,不需要配置源,如果没有或使用其他版本的,可以参看下面方式安装
# 更新软件包
sudo dnf upgrade --refresh -y

# 安装 EPEL 源
sudo dnf install \
   https://dl.fedoraproject.org/pub/epel/epel-release-latest-9.noarch.rpm \
   https://dl.fedoraproject.org/pub/epel/epel-next-release-latest-9.noarch.rpm

# 安装 Remi 源
sudo dnf -y install http://rpms.remirepo.net/enterprise/remi-release-9.rpm
sudo dnf -y install  dnf-utils

# 删除已有(可选)
sudo dnf -y remove php php-fpm
# 删除相关扩展包
sudo dnf -y remove php*
# 重置 PHP 模块列表
sudo dnf -y module list reset php

# 查看 PHP 版本
sudo dnf module list php

# 启用 PHP
sudo dnf -y module enable php:remi-8.2

# 安装 PHP
sudo dnf -y install php
sudo dnf -y install php php-fpm

# 安装扩展
sudo dnf install php-cli php-fpm php-curl php-mysqlnd php-gd php-opcache php-zip php-intl php-common php-bcmath php-imagick php-xmlrpc php-json php-readline php-memcached php-redis php-mbstring php-apcu php-xml php-dom php-redis php-memcached php-memcache

# 查询扩展
sudo dnf search php82-php- | grep swoole

# 安装 php-devel(phpize)
sudo dnf -y install php-devel

# 修改 php-fpm
vim /etc/php-fpm.d/www.conf
# 修改:
user = nginx
group = nginx
# 重启
sudo systemctl restart php-fpm.service

# 配置 nginx 解析 PHP
vim /etc/nginx/nginx.conf
# 修改一
root         /www;
# 修改二
location ~ \.php$ {
   root           /www;
   fastcgi_pass   unix:/run/php-fpm/www.sock;
   fastcgi_index  index.php;
   fastcgi_param  SCRIPT_FILENAME  $document_root$fastcgi_script_name;
   include        fastcgi_params;
}

# 重启
sudo systemctl restart nginx.service

# 创建 www 目录
mkdir /www
echo '<?php phpinfo();' > /www/index.php

# 添加其他用户操作 www 目录的权限
sudo usermod -a -G nginx 你的用户名
sudo chmod -R 775 /www

# 查询 nginx 版本
nginx -v这块有个问题需要注意,使用这个安装的php没有PHP-FPM 未监听 9000 端口,PHP-FPM 配置为使用 Unix Socket 而非 TCP 端口,
默认配置:PHP-FPM 默认可能通过 Unix Socket(如 /var/run/php-fpm/www.sock)与 Nginx 通信,而非 TCP 端口。
# 查看 PHP-FPM 监听配置
sudo grep '^listen =' /etc/php-fpm.d/www.conf
3.安装docker(mysql5.7)或者自行安装mysql5.7
创建用户并授权
bash-4.2# mysql -u root -p'xiaogui@123'
mysql: [Warning] Using a password on the command line interface can be insecure.
Welcome to the MySQL monitor.  Commands end with ; or \g.
Your MySQL connection id is 177
Server version: 5.7.44 MySQL Community Server (GPL)

Copyright (c) 2000, 2023, Oracle and/or its affiliates.

Oracle is a registered trademark of Oracle Corporation and/or its
affiliates. Other names may be trademarks of their respective
owners.

Type 'help;' or '\h' for help. Type '\c' to clear the current input statement.

mysql> show databases;   # 查看所有库
+--------------------+
| Database           |
+--------------------+
| information_schema |            |
| mysql              |
| performance_schema |
| sys                |
+--------------------+
5 rows in set (0.00 sec)

mysql> create database wordpress;  # 创建库
mysql> grant all on wordpress.* to 'wordpress'@'localhost' INENTIFIED by 'xiaogui@123';   # 创建用户并授权,允许本地访问
mysql> grant all on wordpress.* to 'wordpress'@'172.17.0.%' INENTIFIED by 'xiaogui@123';    # 创建用户并授权,允许172.17.0的网段访问
mysql> FLUSH PRIVILEGES; # 刷新
mysql> select user,host from mysql.user;  # 查看刚才创建的用户和授权
+---------------+------------+
| user          | host       |
+---------------+------------+
| root          | %          |
| wordpress     | 11.0.1.%   |        # 因为我的是在docker容器里面,所以还加了一个物理机11.0.1的网段
| wordpress     | 172.17.0.% |
| wordpress     | localhost  |
| mysql.session | localhost  |
| mysql.sys     | localhost  |
| root          | localhost  |
+---------------+------------+
7 rows in set (0.00 sec)
mysql> exit
测试数据库是否可以连接(本地物理机测试)
[root@rocky-boy ~]# mysql -uwordpress -p'xiaogui@123' -P 3306 -h 172.17.0.2
mysql: [Warning] Using a password on the command line interface can be insecure.
Welcome to the MySQL monitor.  Commands end with ; or \g.
Your MySQL connection id is 184
Server version: 5.7.44 MySQL Community Server (GPL)

Copyright (c) 2000, 2023, Oracle and/or its affiliates.

Oracle is a registered trademark of Oracle Corporation and/or its
affiliates. Other names may be trademarks of their respective
owners.

Type 'help;' or '\h' for help. Type '\c' to clear the current input statement.

mysql> show databases;
+--------------------+
| Database           |
+--------------------+
| information_schema |
| wordpress          |
+--------------------+
2 rows in set (0.01 sec)

mysql>
下来在windows上的C:\Windows\System32\drivers\etc\hosts做域名解析
然后浏览器访问 blog.linux.cn 配置安装
4.配置web02服务器
步骤都一样,先安装nginx和php,暂略
web02服务器配置文件
[root@rocky-boy blog]# cat /etc/nginx/conf.d/blog.linux.cn.conf
server {
	listen 80;
	server_name blog.linux.cn;
	root /usr/share/nginx/blog;

	access_log /var/log/nginx/wordpress.access.log main;

	location / {
	 index index.php;
	}

	location ~ \.php$ {
		fastcgi_pass unix:/var/run/php-fpm/www.sock;
		fastcgi_index index.php;
		fastcgi_param SCRIPT_FILENAME $document_root$fastcgi_script_name;
		include fastcgi_params;
	}
}
创建web02服务器站点目录
web02需要注意的是因为web01已经配置了数据库,web就不需要配置,不然会显示需要安装,这么解决呢?
把web01的站点目录下的所有文件打成tar,gz的压缩包,传到web02的/usr/share/nginx/blog下并解压
[root@rocky-boy blog]# tar xf wordpress.tar.gz
[root@rocky-boy blog]# chown -R nginx:nginx /usr/share/nginx/blog/    # 修改用户权限,否则会报错
[root@rocky-boy blog]# ll
total 76220
-rw-r--r--  1 nginx nginx      405 Mar 27 18:41 index.php
-rw-r--r--  1 nginx nginx    19915 Mar 27 18:41 license.txt
-rw-r--r--  1 nginx nginx     7437 Mar 27 18:41 readme.html
drwxr-xr-x  5 nginx nginx     4096 Mar  3  2022 wordpress
-rw-r--r--  1 nginx nginx 19461582 Mar 22  2023 wordpress-5.9.1-zh_CN.tar.gz
-rw-r--r--  1 root  root  58356915 Mar 27 18:45 wordpress.tar.gz
-rw-r--r--  1 nginx nginx     7165 Mar 27 18:41 wp-activate.php
drwxr-xr-x  9 nginx nginx     4096 Mar 27 18:41 wp-admin
-rw-r--r--  1 nginx nginx      351 Mar 27 18:41 wp-blog-header.php
-rw-r--r--  1 nginx nginx     2338 Mar 27 18:41 wp-comments-post.php
-rw-r--r--  1 nginx nginx     3001 Mar 27 18:41 wp-config-sample.php
-rw-rw-rw-  1 nginx nginx     3278 Mar 27 18:43 wp-config.php
drwxr-xr-x  5 nginx nginx       69 Mar 27 18:43 wp-content
-rw-r--r--  1 nginx nginx     3939 Mar 27 18:42 wp-cron.php
drwxr-xr-x 26 nginx nginx    12288 Mar 27 18:42 wp-includes
-rw-r--r--  1 nginx nginx     2496 Mar 27 18:42 wp-links-opml.php
-rw-r--r--  1 nginx nginx     3900 Mar 27 18:42 wp-load.php
-rw-r--r--  1 nginx nginx    47916 Mar 27 18:42 wp-login.php
修改web02的配置文件指向web01的数据库
运维使用的是容器的mysql,不修改会显示找不到数据,前提是容器的mysql要映射端口到物理机上,否则重新创建运维mysql容器
修改配置文件 wp-config.php
define( 'DB_NAME', 'lidao' );

/** Database username */
define( 'DB_USER', 'lidao' );

/** Database password */
define( 'DB_PASSWORD', 'xiaogui@123' );

/** Database hostname */
define( 'DB_HOST', '11.0.1.138' );   # 只修改这一处,指向web01的物理机地址

/** Database charset to use in creating database tables. */
define( 'DB_CHARSET', 'utf8mb4' );

/** The database collate type. Don't change this if in doubt. */
define( 'DB_COLLATE', '' );
重启 nginx ,php-fpm
[root@rocky-boy01 blog]# systemctl restart nginx php-fpm 5.通过访问代理服务器观察日志
代理服务器
如果windows要访问需要做hosts解析,把代理服务器的ip和域名写进去,然后浏览器访问代理服务器的域名
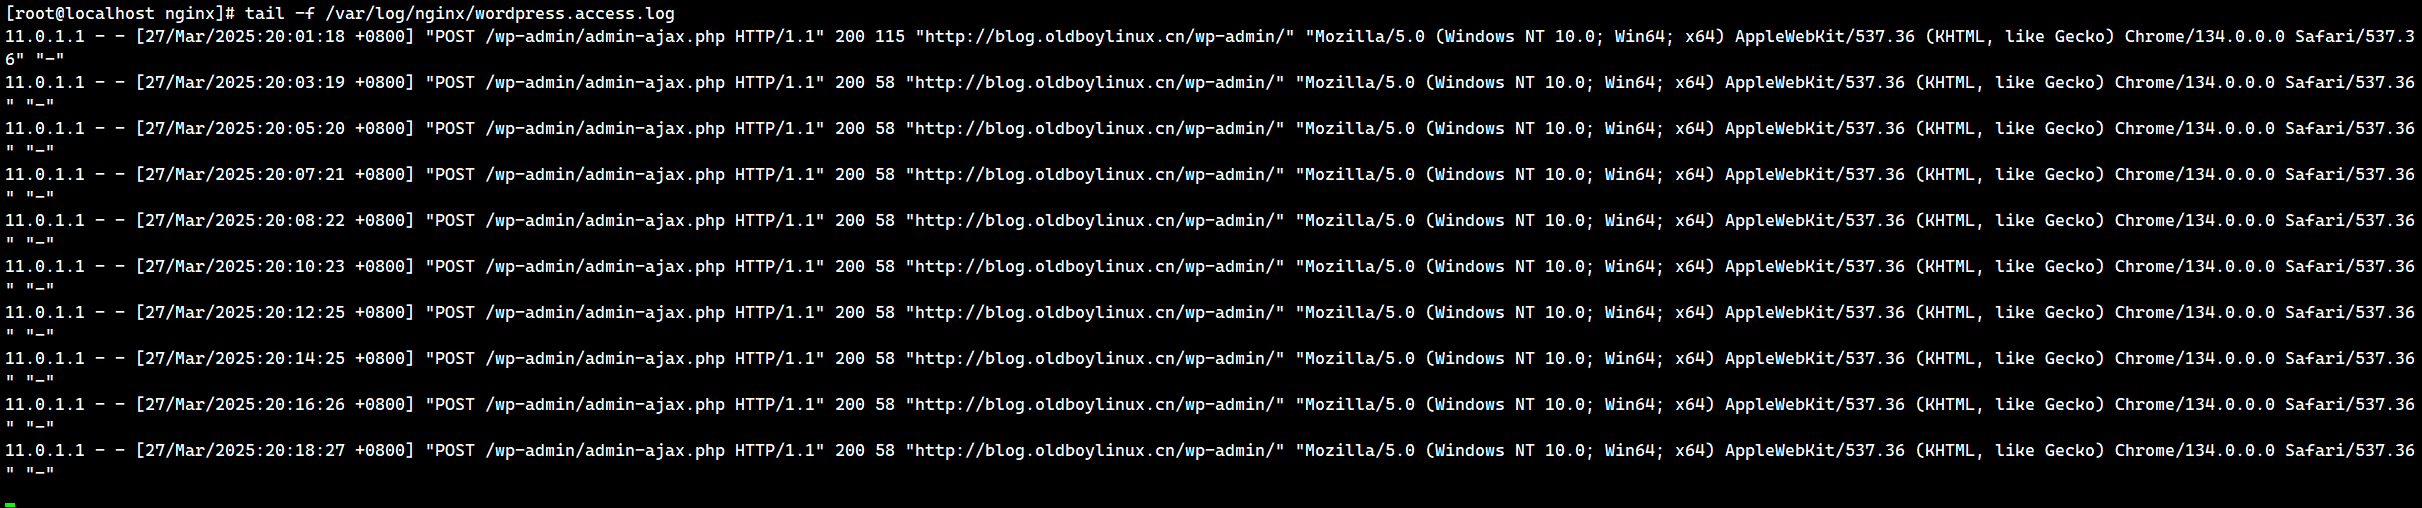
11.0.1.1 真实的客户端地址
web01服务器
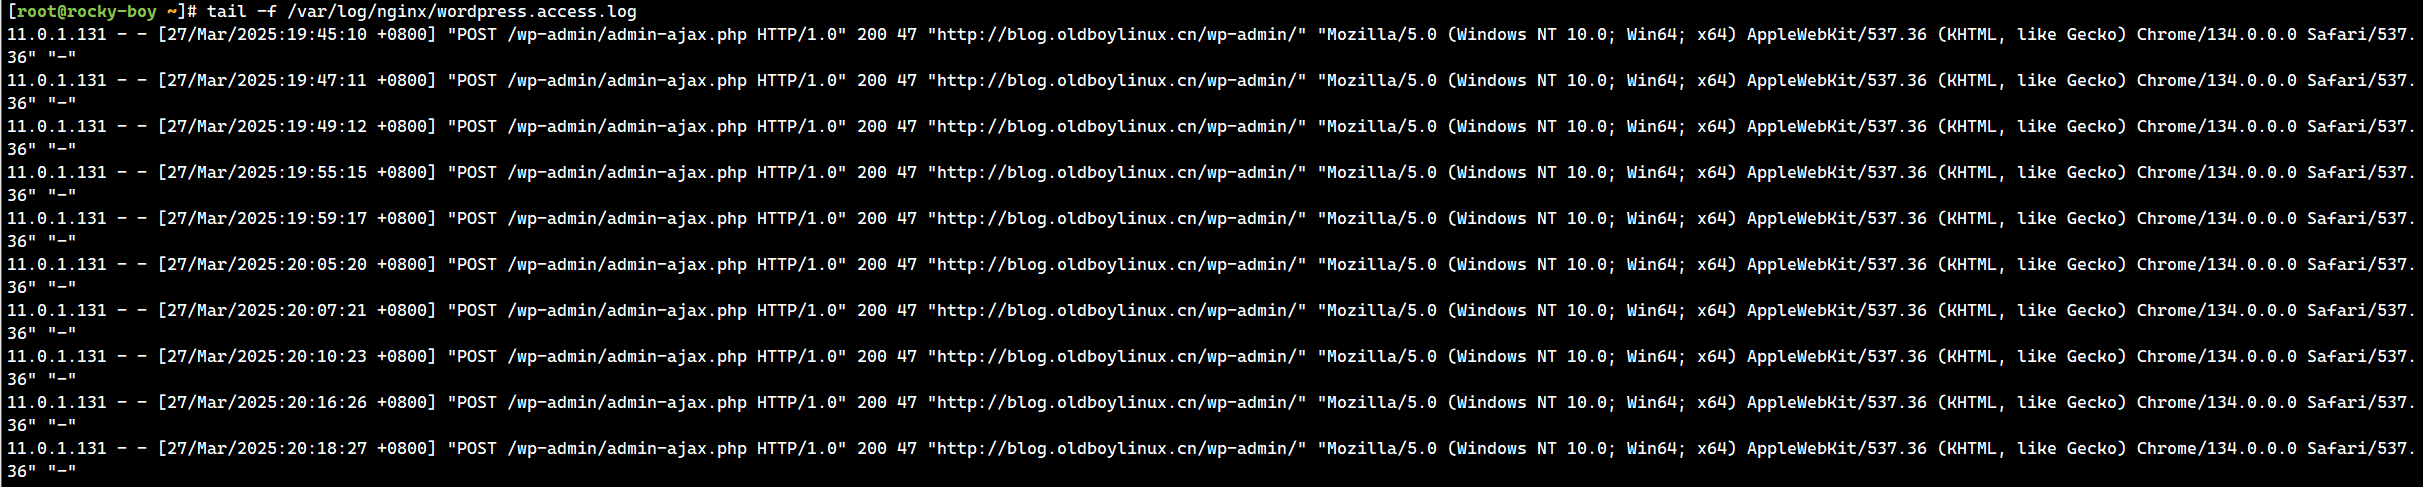
web02服务器

可以看到web01和web02都是代理服务器的11.0.1.131地址,可以通过在代里服务器的blog.linux.cn.conf文件中添加 proxy_set_header X-Forwarded-For $proxy_add_x_forwarded_for; 可以看到真实的客户端ip,到此基于LNMP架构的WordPresss搭建完成,后续也可以做一些更复杂点的,比如数据库做主从,reids缓存等。